Wednesday, June 24, 2009

A detailed look at Binding Model Parameter Options (NDOption)

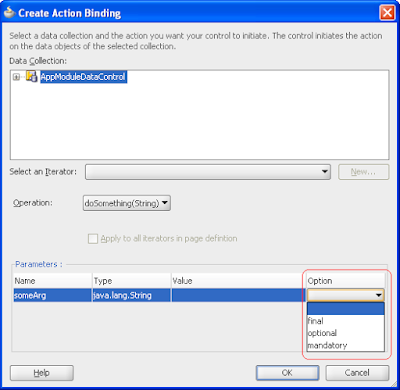
ADF binding layer has been always a pleasant surprise for me. I have not seen such a 'rich glue layer' in any other frameworks. While wiring the business service methods with UI Components , developers can opt for specific 'Parameter Options'. These options would decide how the binding container should assign the value to the parameter(s) at runtime. This article discusses the significance of the Binding Model Parameters Options and their proper usage. Please note that Binding Model Parameters Option is termed as NDOption in your page definition file.

Where can I see Binding Model Parameter Options?
To answer this question let us start building an application and see where we really use this in real life.

Follow the steps given below.

1. Here, I assume that you already have one Fusion Web Application in place, with Application Module defined. Please refer Fusion Developer's Guide for Oracle Application Development Framework in case you are not familiar with building Fusion Web Application.

2. Now generate java files for your Application Module.

3. Go to the generated ApplicationModule implemenetation file(<YourApplicationModuleName>Impl.java) and define a method which takes atleast one parameter as argument. Let it be, public void doSomething(String someArg){}

4. Generate the Java Cleint Interface for this, so that this method can be wired with a web page (jspx, jsp or jsff) using DataControl.

5. Now, select the ViewController project, then create a jspx file.

OK, so far so good. Now let us try defining the binding for this Application Module method.

Please refer 11 Using Oracle ADF Model in a Fusion Web Application if you are not familiar with data binding.

6. Select the binding tab for the jspx, click on '+', this would display Insert Item dialog. Now select methodAction clik OK. 'Create Action Binding' dialog appears as shown below.


Lower half of the dialog displays a Parameter (Binding Model Parameter) table, where the details of method parameters can be found. All columns in the table are self explanatory, except the last two. Value column can have either binding expression or literal values such as constants. In the last column 'Option', you can find a drop down with options as Final, Mandatory and Optional.

Curious to know the significance of the Binding Model Parameter Options? Let me try explaining this with an example

Final, Mandatory, Otional

Below scenarios describe possible parameter options and their influence on the parameter value being passed at runtime.

Final

Final implies that value for parameter can be retrieved by evaluating the specified binding expression, no need to look anywhere else. This indicates that parameter value cannot be set explicitly set by a caller.

The binding model parameter is configured as shown below in the picture


Assume that backing bean code invokes this method action in response to some user action. The method invocation part may look like as below


DCBindingContainer bc = (DCBindingContainer)bcx.getCurrentBindingsEntry();
OperationBinding opb = (OperationBinding)bc.getOperationBinding("someMethod");
// someMethod is with signature public void someMethod(String someArg)
opb.getParamsMap().put("someArg", "someValue");
opb.invoke();


What would be the Input to the method at runtime with the above configuration?

In this case final value being passed for parameter would be the 'evaluated value' of this Expression Language (EL) #{SomeBean.someParam}.

Mandatory

Binding Model Parameter value has to be set by the caller, always. EL or literal value specified in the binding definition will never be considered if the parameter option specified is Mandatory.

The binding model parameter is configured as shown below in the picture


The method invocation part from the backing bean may look like as below


DCBindingContainer bc = (DCBindingContainer)bcx.getCurrentBindingsEntry();
OperationBinding opb = (OperationBinding)bc.getOperationBinding("someMethod");
// someMethod is with signature public void someMethod(String someArg)
opb.getParamsMap().put("someArg", "someValue");
opb.invoke();

What would be the Input to the method at runtime with the above configuration?
Value of parameter would be 'someValue' supplied by caller, won't consider value defined in your binding definition

Optional

Binding definition's value is used only if the caller does not specifically set the parameter. Parameter value defined in your BindingDefinition (pagedef file) is with least precedence here, just opposite to Final.

The binding model parameter is configured as shown below in the picture


The method invokation part from the backing bean may look like as below

DCBindingContainer bc = (DCBindingContainer)bcx.getCurrentBindingsEntry();
OperationBinding opb = (OperationBinding)bc.getOperationBinding("someMethod");
// someMethod is with signature public void someMethod(String someArg)
opb.getParamsMap().put("someArg", "someValue");
opb.invoke();

What would be the Input to the method at runtime with the above configuration?
Value of parameter would be 'someValue' supplied by caller.

Tuesday, June 16, 2009

ADF Business Components With MySQL

Most of the application built on Oracle ADF uses Oracle RDBMS as Database. The driving factor here is to leverage the feature richness of Oracle DB.

Does it mean ADF is tightly coupled with Oracle DB?

Answer is NO, ADF can be well integrated with other databases as well. Small to medium size applications can live even with some light weight databases and they may not require the sophisticated features provided by Oracle DB. MySQL appears to be more popular among the community now a days.

There are quite a lot articles on using ADF with MySQL. But it seems that most of them are outdated or rather ADF improves at lightening speed.

This article can be considered as an extension of How To Use ADF Business Components with MySQL
OK, had enough theory ,now into action.

Setup the basic infrastructure

JDeveloper discussed in this article is based on version 11.1.1.1.0 and MySQL is 5.x or higher.

Apparently, JDeveloper is not packaged with JDBC driver library for MySQL. So let us go and down load it from the MySQL download centre for absolutely free.
Download Connector/J 5.1

The latest version currently available is mysql-connector-java-5.1.7-bin.jar.
Copy this library to a known location such as <jdevhome>/jdev/lib which needs to be supplied at later stage when we setup the application environment.
So we have procured necessary binaries, now let us proceed to setup a typical application environment which uses MySQL Database

Setup the application environment

Create a new application using JDeveloper
1. Go to Appliation Navigator-> Select New,this opens up a Create New Application wizard.
2. Select Fusion Web Application(ADF)template
3. Click Finish.

Now let us try adding the JDBC driver jar for MySQL to the classpath of this application.

1. Form the main menu toolbar, select the Application menu.
2. Select 'Default Project Properties'.


3. In the tree view select "Libraries and Classpath".
4. Click On the "Add Library..." button.
5. From the 'Add Library' dialog, click on New...
6. "Create Library" dialog is displayed. Name the library as MySQL JDBC. Select location as user from the drop down.
7. Click on Add Entry.
8. From 'Select Path Entry' dialog, navigate to the JAR file for the MySQL Connect/J JDBC driver (it should be called something like mysql-connector-java-<version>-bin.jar).
9. Click on the jar file and click Select. We have copied this jar file to /jdev/lib during the infrastructure setup.


10. Click OK on Create Library Dialog.
11. Click OK on Add Library dialog.
12. One more time OK on Default Project Properties dialog.

Create the Connection and verify the resource

1. Go to Application Resources pane. Right click New Connections->Database. Create Database Connection wizard will be displayed.
2. Define your connection name as you like.
3. From the Connection Type dropdown list, select MySQL.
4. Set the username and password and click deploy password.
5. Enter MySQL settings. Enter HostName,DataBaseName and port name as per your MYSQL server configuration.
6. Click on 'Browse' button next to 'Library' field. In the 'Select Library' dialog choose the MySQL JDBC library that you defined earlier ( while setting up the application environment).


7. Click OK on 'Select Library' dialog
8. Click to Test Connection.
9. Click Finish.

Creating Entity Objects


Before staring this step please keep an eye on following two points.

1. MySQL does not support RowID. Implies that you cannot use RowID as a replacement for a primary key.
2. All tables must have a primary key.

Now let us create Entity Objects and View Objects. This is similar to the normal entity creation irrespective of the database
Please refer Fusion Developers Guide for more details.
Anyway, summarizing the steps below for beginners
1. Right Click the model Project , select "New".
2. From the Gallery select "Business components From Table".
3. From the 'Create Business components From the Table' select right schema and click on Query.
4. If all the configurations are correct then we can see the the tables defined in the schema/DB is displayed. Proceed to create Entities and Views and finally press finish.

Congratulations! You have done all the basic setup for staring the application development using MySQL

Setup the Deployment Environment

The above steps are sufficient to run the application from AM Tester. But when you try deploying it, application server may throw following error.


Cannot load the driver : com.mysql.jdbc.Driver weblogic

Solution is add the MySQL JDBC driver jar to Weblogic classpath. Edit setDomainEnv.cmd file under <userhome>\Application Data\JDeveloper\system<version>\DefaultDomain\bin to add mysql-connector-java-<version>-bin.jar